keen-ToggleTransparencyGrid

Here’s a quick, frequently-requested script to toggle the transparency grid in the active viewer. Download the ZIP file below, unzip it, and copy the contents into your After Effects script folder.

If you’d like to create a keyboard shortcut to invoke this script so you can toggle the transparency grid from the keyboard, please see these instructions on Aescripts.com [link].

Taking a cue from Jeff Almasol [link], I’m releasing this as part of the #devforacause project. If you find this useful, please consider making a donation to a charity that’s important to you, and tell us how you’re paying it forward with the Twitter hashtag #devforacause.

keen-ToggleTransparencyGrid

Posted by Walter Soyka, 0 comments

Walter’s Field Notes on Safeguarding After Effects Project Files

  1. Keeping only a single copy or version of your project file is bad practice. You might accidentally delete the file. Your hard drive might fail. Ae might crash and corrupt the project. You might make a change you later decide you don’t like, but unable to roll back to where you were before. Back it up!
  2. Get in the habit of using Increment and Save. Often. Increment and Save automatically appends a version number or increments the existing version number at the end of your project file name. When you increment and save “My Awesome Project.aep” the first time, you’ll keep the original file and get a new “My Awesome Project 1.aep” file. When you increment and save again, you’ll keep both the original and version 1 and get a new “My Awesome Project 2.aep” file. If anything goes wrong, you have previous saves you can use.
  3. Check your auto-save settings. The default settings are to auto-save every 20 minutes, and to keep the last 5 auto-saves. For safety’s sake, you might consider auto-saving more frequently, or keeping more auto-saves.
  4. Keep file versions outside of Ae, too. Dropbox and Apple’s Time Machine capture and store multiple version changes of the same file. If anything goes wrong, you can use these to roll back to a previous version of your AEP.
  5. Do all your Warp Stabilization in a separate project file. The image analysis is saved into the effect and thus into the project file, so the AEP gets way too big to comfortably deal with. Big files are slow to save, and this will discourage you from incrementing and saving as often as you should, and it will frustrate you when auto-save interrupts your flow.
Posted by Walter Soyka, 0 comments

keen-TrimRemap

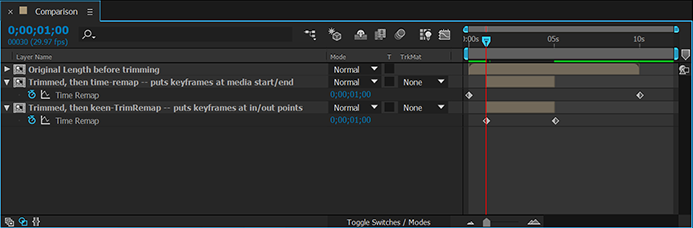
In After Effects, when you enable Time Remapping for a layer, it automatically sets two keyframes: one at the media start and one at the media end, irrespective of how you may have trimmed the layer.

If you’d prefer your key frames to be spaced at the in point and out point of the layer — in other words, if you’d like time remapping to work on your trimmed time range instead of the entire media’s time range — you can use keen-TrimRemap.

Here’s a screenshot showing the difference between using Ae’s “Enable Time Remapping” command and running keen-TrimRemap:

keen-TrimRemap-screenshot

You can use this script like any other; just download it, unzip it, and place it in the After Effects script folder [link].

However, if you’d like, you can also replace Ae’s normal time-remapping behavior with this script. To do this we’ll take advantage of the fact that you can assign keyboard shortcuts to the first 20 scripts in your script folder.

Rename the keen-TrimRemap.jsxbin file I’ve provided as 01-keen-TrimRemap.jsxbin in your After Effects script folder. This will force it to the top of the list, so we will know it’s the first script in the menu.

Next, in After Effects, open “Preferences > General.” Down at the bottom of the dialog box, you’ll see a button that says “Reveal Preferences in Explorer” on a PC or “Reveal Preferences in Finder” on a Mac. Click that.

Locate the shortcuts file (mine is named Adobe After Effects 13.2 Win en_US Shortcuts.txt) and open it in a text editor. Search for the text EnableTimeRemap — you’ll find a line like the following (it will be slightly different on a Mac):

"EnableTimeRemap" = "(Ctrl+Alt+T)"

Select everything in between the parentheses and cut it out. Look a couple lines down, at this line:

"ExecuteScriptMenuItem01" = "()"

Paste the shortcut in between the parentheses.

Basically, we are changing these two original lines:
"EnableTimeRemap" = "(Ctrl+Alt+T)"
"ExecuteScriptMenuItem01" = "()"

To these:
"EnableTimeRemap" = "()"
"ExecuteScriptMenuItem01" = "(Ctrl+Alt+T)"

Now, when you use the keyboard shortcut for time remapping, Ae will run the script instead of using the built-in command. Of course, you can restore the defaults at any time by changing the shortcut back, or by resetting your preferences and shortcuts. You can also still invoke Ae’s command from the menu system.

Feedback on these scripts is always welcome.

Download keen-TrimRemap [link]

Posted by Walter Soyka in Tools / Scripts, 0 comments

keen-Fade

Here’s a simple After Effects script, based on an in-house tool and requested by Jonas Rue [link], which makes adding keyframe-based fades to selected layers based on the location of the current time indicator as easy as pushing a button.

Here’s the script’s UI:

keen-Fade-UI


The script will create opacity and audio levels fades from the CTI on selected layers and trim (or extend) the layers accordingly. In the case above, pressing the “Fade selected layers in” button would create a fade in from 30 frames before the current time up to the current time. Pressing the “Fade selected layers out” button would create a fade out from the current time to 30 frames past it.

And here’s a timeline before and after:

keen-Fade-BeforeAfter


If a layer is selected, and if the layer spans the CTI, and if the layer’s extents can be set according to the script’s settings, then the fade will be created. Unselected layers, selected or unselected layers not touching the CTI, and AV layers which cannot be extended to accommodate the fade settings because of a media limit will not be affected.

To install, download, unzip, and place the keen-Fade.jsxbin file in your Script UI panels folder:

  • (Windows) Program Files\Adobe\Adobe After Effects <version>\Support Files\Scripts\ScriptUI Panels

  • (Mac OS) Applications/Adobe After Effects <version>/Scripts/ScriptUI Panels

Once installed, keen-Fade can be invoked from the Window menu.

Taking a cue from Jeff Almasol [link], I’m releasing this as part of the #devforacause project. If you find this useful, please consider making a donation to a charity that’s important to you, and tell us how you’re paying it forward with the Twitter hashtag #devforacause.

Download keen-Fade [link]

Posted by Walter Soyka, 0 comments

keen-CompMarkersMake

Here’s a quick script to create comp markers at regular intervals as follows:

Regularly-spaced comp markers

When you run keen-CompMarkersMake, it will open a dialog box asking you how often it should create comp markers. The default interval is every 12 frames.

Three major points to keep in mind:

  1. The marker interval is measured in frames.
  2. The marker interval will begin at the current time in the comp. In other words, the first marker will be placed at the current-time indicator (CTI).
  3. Marker creation will be limited to the work area.

To run, download and unzip this script. You may place it in your After Effects script folder (or drag it into your project with Ae CC 12.1 and higher), restart Ae and run it from the File > Scripts menu, or you may run it from anywhere via File > Scripts > Run script file…

Download keen-CompMarkersMake-v1 [link]

Posted by Walter Soyka, 0 comments

keen-UncleMatte

If you have a lot of track matte layers and want to manage their selection, or if you want to precompose the matte and fill layers, here’s keen-UncleMatte:

keen-UncleMatte-v2-screenShot

Selection and precomposing should work as advertised, but if you run across any issues, please do let me know and I’ll try to sort them out.

Unzip the script and place in your After Effects ScriptUI folder, then invoke from the Window menu.

Taking a cue from Jeff Almasol [link], I’m releasing this as part of the #devforacause project. If you find this useful, please consider making a donation to a charity that’s important to you, and tell us how you’re paying it forward with the Twitter hashtag #devforacause.

Download keen-UncleMatte-v2 [link].

Posted by Walter Soyka in Tools / Scripts, 0 comments

keen-UnUnMult: A workaround for the UnMult bug in Ae 13.1 (CC 2014.1)

The CC 2014.1 release of After Effects (version 13.1) has a nasty bug which causes the application to fail on effects with no properties, like the popular Red Giant Software’s UnMult effect [link], with a never-ending barrage of error message windows:

After Effects error: internal verification failure, sorry ! {unexpected match name searched for in group} ( 29 :: 0 )

After Effects error: internal verification failure, sorry ! {unexpected match name searched for in group} ( 29 :: 0 )

The Ae team is working on a fix [link], and it should be out soon, but in the meantime, I’ve developed a workaround.

I’ve written a script, keen-UnUnMult, which searches a project file for any instance of UnMult and replaces it with one of three unmultiplication alternatives:

keen-UnUnMult-v1x3-screenshot

Each UnMult alternative has pros and cons. Channel Combiner plus Remove Color Matte is a good match for the look of UnMult, but is limited to 8bpc. Set Matte plus Remove Color Matte works at 8-, 16- or 32bpc, but is not mathematically or visually identical to UnMult results. Video Copilot’s free Vibrance effect [link] can do unmultiplication, but it’s third-party and produces slightly different results.

None of these replacements may be perfect, but if you are having trouble opening and using an older project with the current 13.1 release of After Effects, this script may be able to help you.

You can download the script below. Unzip and drag the keen-UnUnMult-v1x3.jsxbin file into your ScriptUI folder:
PC: C:\Program Files\Adobe\After Effects CC 2014\Support Files\Scripts\ScriptUI Panels
Mac: /Applications/Adobe After Effects 2014/Scripts/ScriptUI Panels

If your UnMult project crashes immediately upon opening in Ae 13.1, hold the Shift key while opening the project. This opens the project but does not open any comp viewers and should get you past the error loop. From the Window menu, select keen-UnUnMult, choose your replacement method, and click the button.

This is working nicely here, but I haven’t done exhaustive testing. Please report back any issues and I’ll try to get them fixed ASAP.

I’m taking a page from Jeff Almasol’s book here: if this gets you out of a jam, please consider making a donation to a charity that matters to you and tell us about it on Twitter with the #devforacause hashtag.

Download keen-UnUnMult-v1x3 [link].

Posted by Walter Soyka, 24 comments

After Effects Script: keen_3dLayerTools

I previously published a script which centers and orients layers to the active camera [link].

Building on that, I’ve published a new version which also adds a tool for promoting 2D layers to 3D in the active camera’s view, keeping the apparent 2D positioning.

Taking a cue from Jeff Almasol [link], I’m releasing this as part of the #devforacause project. If you find this useful, please consider making a donation to a charity that’s important to you, and tell us how you’re paying it forward with the Twitter hashtag #devforacause.

Download keen_3dLayerTools [link]

Unzip the script and drop it in your ScriptUI folder. Relaunch After Effects, then open it from the Window menu.

Posted by Walter Soyka in Tools / Scripts, 1 comment

Suppress After Effects save-on-crash

After Effects has a very useful feature wherein it attempts to save your project if it detects a crash. However, in certain cases where you’re really pushing the envelope or trying to troubleshoot a problem, this may not be desirable behavior [link].

Here’s a quick script which lets you toggle this save-on-crash behavior. It’s just a simple checkbox to turn it on and off:

keen_ToggleCrashSave Screenshot

keen_ToggleCrashSave Screenshot

Download keen_ToggleCrashSave script [link]

To install, unzip this and install the .jsxbin file into your ScriptUI folder [link].

To use after installation, click the Window menu and choose keen_ToggleCrashSave to open the panel.

Posted by Walter Soyka in Tools / Scripts, 0 comments

Rigging Ae Comps with the New “Templates” Feature

Adobe Creative Cloud 2014 brings some exciting features to After Effects and Premiere, including Live Text Templates [link].

Live Text Templates allow you to designate an Ae comp as a template for use via Dynamic Link in Premiere. Once you import the comp into Premiere, unlocked text layers within that Ae comp will be directly editable inside of Premiere, without the editor having to open After Effects to make a text change.

I love using tools in ways that weren’t quite intended, so I’ve been experimenting with a technique for hijacking templates to create rigged After Effects comps. Instead of just passing live text from Premiere to After Effects, I’m passing parameters that allow the Premiere editor to control other aspects of the Ae comp. Beyond editing text, this allows the editor to define sizes of elements, colors, timings, or anything else you care to develop in Ae.

The trick is that the live text comes from Premiere into After Effects as a text layer’s text.sourceText property. This means that the live text from Premiere can be read with and acted upon by After Effects expressions on other properties.

Here’s a quick demo that shows the “rigged template” technique in action and explains how it’s done in a little more depth:

Fair warning: this is a bit of a hack. It works, and it’s cool, but it’s undocumented and unsupported. Ultimately, I’d love to see this template functionality extended to explicitly support passing parameters from Pr to Ae. If you’d like to see that too, please consider filing a feature request [link].

But in the meantime, if you’re at all into Ae and Pr, and if you’re comfortable with expressions, give this technique a spin and see what you come up with.

Posted by Walter Soyka in Tips, 7 comments